---
title: Create a Course
description: Find out how to create your course, from drafting completion criteria to managing back-end settings.
---
[Back to home](https://learninganddevelopment.hubspot.com/learnhubspot)
- [ Course Management
](https://learninganddevelopment.hubspot.com/learnhubspot/course-management)
- [ Reporting
](https://learninganddevelopment.hubspot.com/learnhubspot/reporting)
- [ Audiences
](https://learninganddevelopment.hubspot.com/learnhubspot/audiences)
- [ Dashboards
](https://learninganddevelopment.hubspot.com/learnhubspot/dashboards)
- [ Users & Enrollment
](https://learninganddevelopment.hubspot.com/learnhubspot/users-enrollment)
- [ Certifications
](https://learninganddevelopment.hubspot.com/learnhubspot/certifications)
- [ Programs
](https://learninganddevelopment.hubspot.com/learnhubspot/programs)
- [ Learn@HubSpot & Workday
](https://learninganddevelopment.hubspot.com/learnhubspot/learnhubspot-workday)
- [ Learn@HubSpot LIVE (PlusPlus)
](https://learninganddevelopment.hubspot.com/learnhubspot/learnhubspot-live-plusplus)
# Create a Course
## Find out how to create your course, from drafting completion criteria to managing back-end settings.
| ### Table of Contents [Create a Course (using the Learn@HubSpot Course Template)](https://learninganddevelopment.hubspot.com/learnhubspot/how-to-create-a-course#create-course-template) - Recommended [Create a Course (without using the Learn@HubSpot course template)](https://learninganddevelopment.hubspot.com/learnhubspot/how-to-create-a-course#create-a-course-no-template) [Set Up Your Course Page](https://learninganddevelopment.hubspot.com/learnhubspot/how-to-create-a-course#set-up-your-course-page) - [Rearrange the Left Sidebar Menu](https://learninganddevelopment.hubspot.com/learnhubspot/how-to-create-a-course#rearrange-the-left-sidebar) - [Add a Title to Your Course](https://learninganddevelopment.hubspot.com/learnhubspot/how-to-create-a-course#add-a-title-to-your-course) - [Add a Course Description](https://learninganddevelopment.hubspot.com/learnhubspot/how-to-create-a-course#add-a-course-description) - [Add Course Content](https://learninganddevelopment.hubspot.com/learnhubspot/how-to-create-a-course#add-course-content) - [How to Add a SCORM Package](https://learninganddevelopment.hubspot.com/learnhubspot/how-to-create-a-course#how-to-add-a-scorm-package) - [How to Add a Google Slide Deck](https://learninganddevelopment.hubspot.com/learnhubspot/how-to-create-a-course#how-to-add-a-google-slide-deck) - [How to Add a Loom Video](https://learninganddevelopment.hubspot.com/learnhubspot/how-to-create-a-course#How-to-add-a-loom-video) [Set Course Completion](https://learninganddevelopment.hubspot.com/learnhubspot/how-to-create-a-course#set-course-completion) |
| --- |
Courses contain the activities and resources that learners will access to undertake their training. A course is typically a single page broken into sections with links to the activities and resources that the learner should complete. A course can also contain multiple links to other courses - an example is the HubSpot Foundations Flex agenda page ([Day 1: Welcome to HubSpot](https://learn.hubspot.com/course/view.php?id=680)).
There are two main ways to make a course:
- Load a pre-existing course (using the Learn@HubSpot Course Template) and then make changes. [Recommended]
- You can [create one from scratch](https://learninganddevelopment.hubspot.com/learnhubspot/how-to-create-a-course#create-a-course).
There are **two** key things to take note of when creating a course:
1. You must edit both General settings and Course Completion settings (criteria that the learner must fulfill to complete the course).
2. You must set up the layout of and build your course page (add a Title, Description, the course's actual body/content, and other parts), as well as set up the left sidebar menu for navigation.
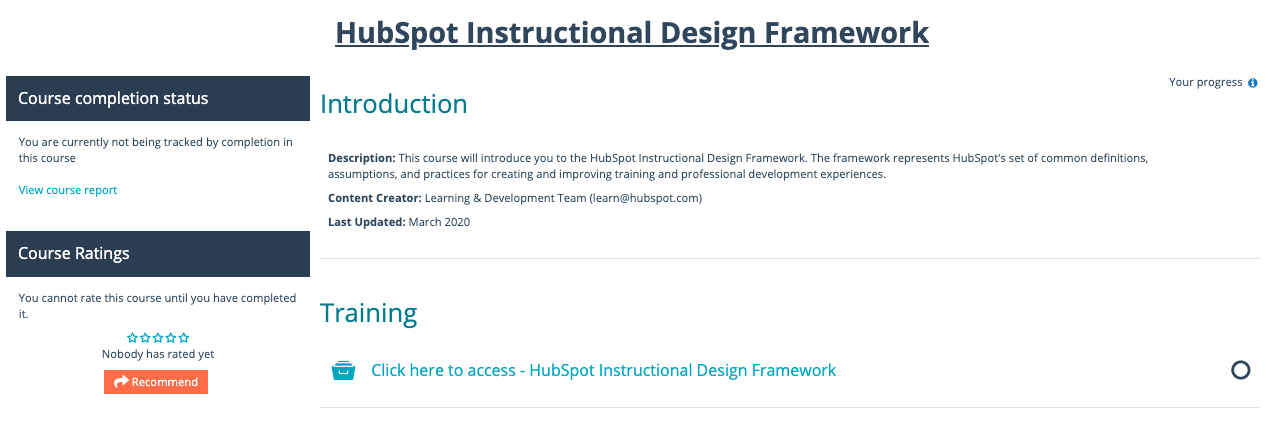
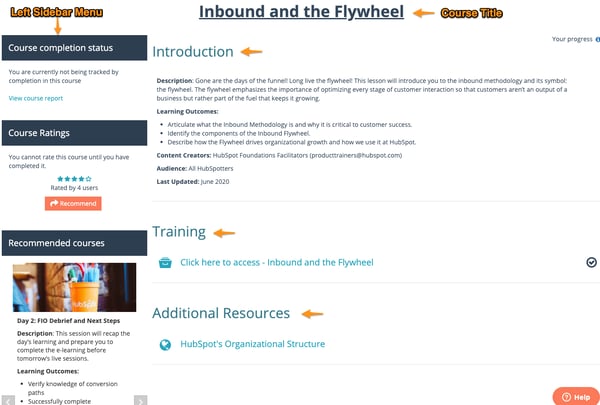
This is an example of a course set up correctly.
---
### Create a Course (using the Learn@HubSpot course template)
1. Navigate to the Learn@HubSpot course template by searching for it in the course catalog or [clicking here](https://learn.hubspot.com/course/view.php?id=1450).
2. Follow the directions in the video below to create a backup of the course template.
Tip: It's always a good idea to check the course template to see if it has been updated before creating a new course so you can use the most updated template. If nothing has changed since the last time you created a backup, then you don't need to create a backup again.
3. Follow the directions in the video below to restore the course to a brand new one.
4. Follow the directions in the video below to edit the new course page and customize it to your needs. The video also reviews how to [edit the course settings](https://learninganddevelopment.hubspot.com/learnhubspot/how-to-edit-a-courses-settings) in order to make sure you have the necessary information for learners.
**Tip: **[Check out this slide deck](https://learninganddevelopment.hubspot.com/learnhubspot/how-to-create-a-course) for information on how to export your SCORM package from Articulate Rise so you can capture the completion information correctly.
### Create a Course (without using a template)
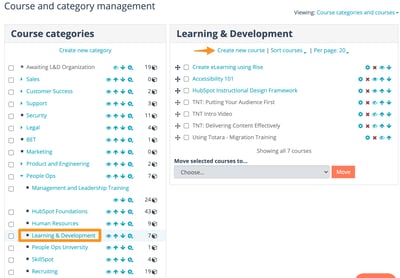
1. In Learn@HubSpot, click the **settings gear icon ** in the top right corner, then click **Courses and categories**.
**Please note:** you can also navigate to **Courses and categories **by selecting it from the** Site Administration **menu on the left sidebar menu found on any course page.
2. Click the category your course should be in. If you're not sure what category you should choose, email learn@hubspot.com.
3. A window will show up on the right or underneath where you're looking (this will display the courses already in that category).
4. Click** Create new course**.
|  |
| --- |
5. Under **General,**
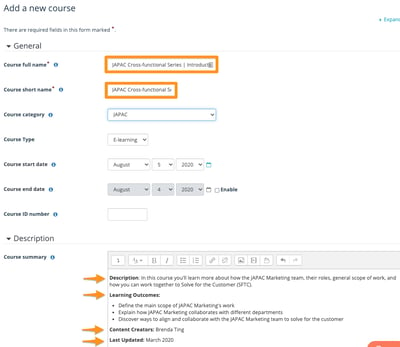
- Set the **Course f****ull Name **and **Course short name **(these should match).
- **Skip** everything else.
6. Under **Description,**
- Under *Course summary, a*dd in the **course description**.
- - This should include a description, learning outcomes (if you have them), content creator(s), and last updated.
|  |
| --- |
- Leave the portion under *Course summary files* blank.
7. **Skip** *Course format *settings*.*
8. Under **Appearance settings,**
- Insert an **image** (this will be the thumbnail image that will be displayed to learners).
- **Skip** everything else.
9.** Skip** the following settings: *Files and uploads *and *Completion tracking*.
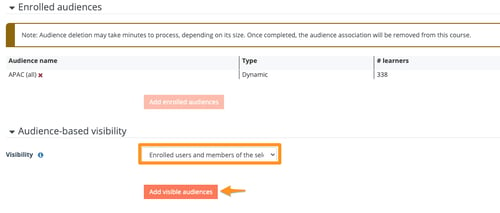
10*. *Under **Enrolled audiences**, click **Add enrolled audiences **if you wish to enroll a specific **Audience. **Otherwise, skip this.
**Please note**: if you have enrolled audiences into a course, it does not mean that they automatically have visibility to the course. Please take note to check the Visibility settings under **Audience-based visibility **and make sure that visibility is not set to "No users".
11. Under **Audience-based visibility**, keep *Visibility* to **All users **unless you wish to hide this course from specific individual learners or audiences.
**Please note**: if you have selected **Enrolled users and members of the selected audiences **for *Visibility, *please proceed to click the **Add visible audiences** button below it and select the approriate audience(s). The audiences you select here will also have visibility of the course (in addition to your enrolled audiences). Learners who are not selected here and are not part of an enrolled audience will not be able to view your course.
12*.*** Skip** the following settings*: Groups*, and *Role-renaming.*
13. Under **Custom Fields,**
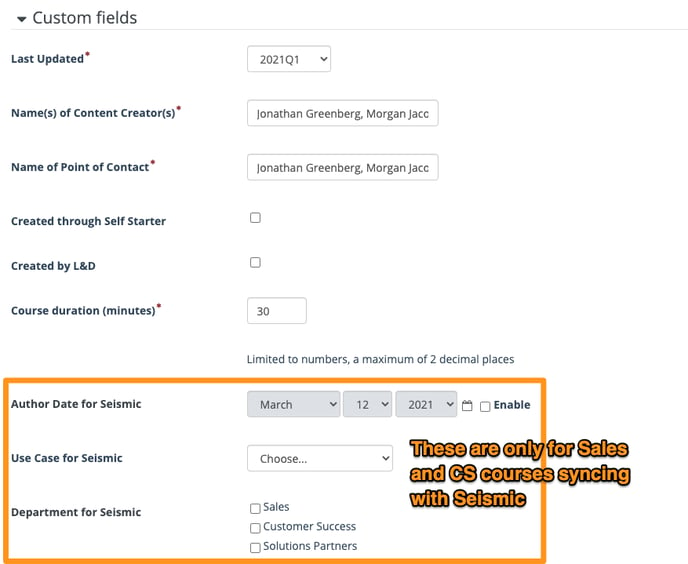
- Under *Last Updated, *select the **quarter** you’re uploading the course (the current quarter).
- Under *Name(s) of Content Creator(s),*
- For non-L&D: Enter the **full name/names**.
- For L&D: Enter the **name of the group** (ex: Support Foundations Facilitators or Learning & Development Team).
- Under *Name of Point of Contact,*
- For non-L&D: Enter the **full name/names**.
- For L&D: Enter the **name of the group** (e.g. Support Foundations Facilitators or Learning & Development Team).
- Under *Created through Self Starter*, select the **checkbox** if it was created through the Learn@HubSpot Self-Starter program (applicable for the LXD team only).
- Under *Created by L&D,* select the **checkbox** if it was created by L&D.
- Under *Course duration, *enter a **number** (up to 2 decimal places).
|  |
| --- |
**For courses that need to sync with Seismic (this is only Sales and CS courses):**
- For *Author Date for Seismic*, click **Enable** and update the date field to match the last updated date in the description.
- For *Use Case for Seismic*, please **select** 1 of the 6 skill buckets this course aligns to (Prospecting, Discovery, Storytelling, Deal Management, Product Knowledge, or Policies & Operations).
- For *Department for Seismic*, **select** the checkbox for the corresponding department.
- NOTE: If you have approval from more than one department (ex: CS Foundations/CS Enablement team or Sales Foundations/Sales Enablement) to to make this available to all Go to Market reps, you can you can select more than one.
14. Under** Tags, **click the dropdown menu and select the appropriate tags. If a tag does not exist, enter the **name** of a new tag in the dropdown menu box and hit **Enter** (PC) or **Return** (Mac) to create it.
15. **Skip*** Search metadata*.
16. Click **Save and display**.
Your new course page will show up. Continue the instructions below to set up your course page.
---
### Set Up Your Course Page
Your course page should show a left sidebar menu and various sections with dotted borders. The middle sections (by default, the three "Topic" sections) are where you should [add your course's description](https://learninganddevelopment.hubspot.com/learnhubspot/how-to-create-a-course#add-a-course-description) and [content](https://learninganddevelopment.hubspot.com/learnhubspot/how-to-create-a-course#add-course-content).
**Please note:** typically, a course page should have:
- A left sidebar menu.
- A course title.
- An "Introduction" section containing a course description.
- A "Training" section containing the key training materials such as an e-learning (SCORM file), a slide deck, etc.
- [Optional] An "Additional Resources" containing additional training resources such as worksheets, links, etc.
---
### Rearrange the Left Sidebar Menu
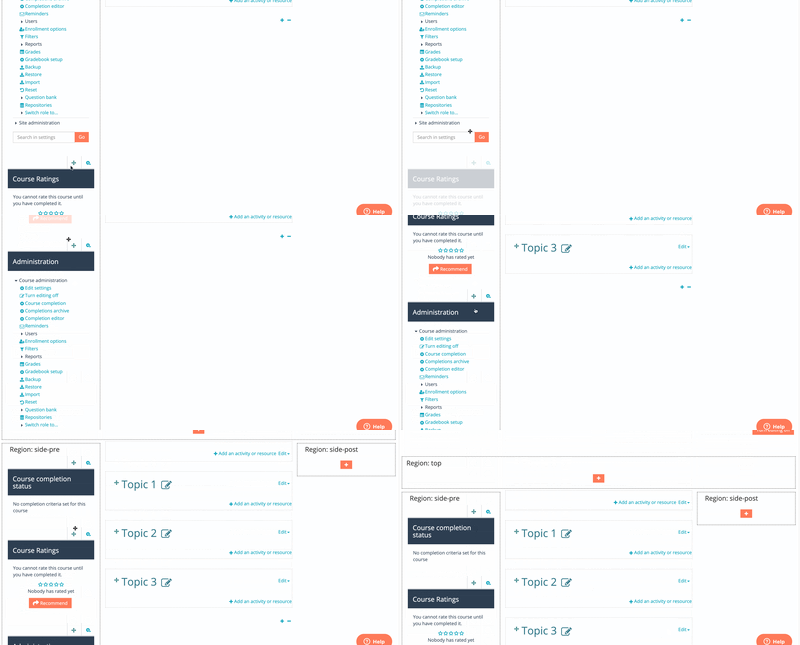
1. On the course page, click the **Turn editing on** button in the top right corner.
2. Using the four way arrow , move the blocks in the left sidebar menu.
3. Drag and drop the blocks as needed.
|  |
| --- |
**Pro tip: **It's better to move blocks up, rather than down. For e.g. if you need to move the top block to the bottom, move the other blocks above it.
**Please note: **the recommended order of items in the left sidebar menu is
- Course completion status
- Course Ratings
- Recommended courses
- Administration
- (new HTML block) (optional)
---
### Add a Title to Your Course
1. On the course page, click the** Turn editing on** button in the top right corner.
2. Under *Region:top *section, click the **orange “+” button.**
3. Type **HTML** in the search box and click it to select it.
4. You should now see a block titled "(new HTML block)".
5. Click the **gear icon**  above this block.
6. Click **Configure (new HTML block) block**.
7. Click **Expand all** in the upper right corner.
8. **Clear the following checkboxes:** *Allow block hiding*, *Allow block docking*, *Show header*, and *Show Border*.
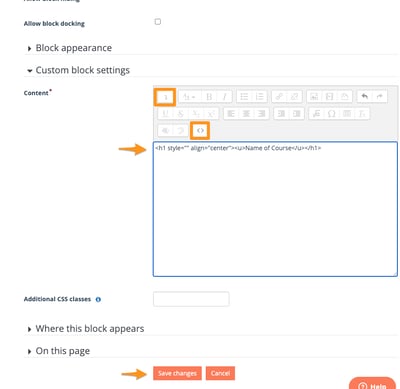
9. Under **Custom block settings, **follow the directions below to **add the HTML code for your Course Title**:
1. - Under *Content*, click the** rightwards arrow with corner downwards** **button ** to expand the toolbar.
- Click the **code** **button ** to open the HTML editor.
- Paste the following text in the HTML editor:
**Name of Course<**/u>
2. Click **Save changes.**
|  |
| --- |
**Please note: **after you click **Save changes**, you’ll still see a block that says “(new HTML block)” above the title you added in. This is only in the admin view and it goes away if you click the **Turn editing off** button in the top right corner.
---
### Add a Course Description
**Please note**: all courses should have a course description. To add a course description, you'll need to add a **Label**.
1. On the course page, click the** Turn editing on** button in the top right corner.
2. Click on the text **Topic 1**, and type in *Introduction. ***Hit Enter** (PC) or** Return** (Mac)
3. Under *Introduction* section, click the **Add an activity or resource **link**. **5. Click **Save changes**.
4. Select **Label **under *RESOURCES.*
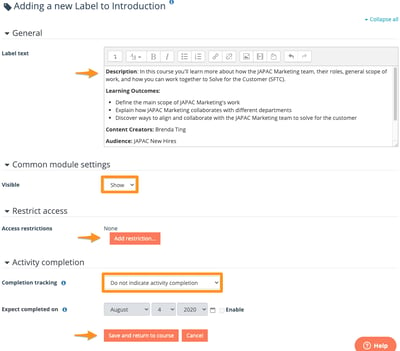
5. Click **Add **and you will see *Adding a new Label to Introduction*.
6. Under **General,** add your content to the rich text box beside *Label text. *
- This should include a description, learning outcomes (if you have them), content creator(s), and last updated. In this case, we will paste the same course description as the one you added when you first created the course.
7. Under **Common module settings, **select **Show** if you want your activity to be visible to learners.
8. Under **Restrict access, **click the** Add restriction **button if you want to restrict access to this label from some users.
9. Under **Activity completion, **select **Do not indicate activity completion for ***Completion tracking***.**
**Completion Tracking Options:**
- **Do not indicate activity completion**: Turns completion tracking off for this activity.
- **Learners can manually mark the activity as completed**: Allows learners to mark themselves as complete by checking the box next to the activity on the course page.
10. Click **Save and return to course. **
|  |
| --- |
---
### **Add Course Content**
You can add an **activity** or a **resource** for your course content.
- **Activities** are interactive content that you can add to a course - an example of an activity is an a [SCORM package](https://learninganddevelopment.hubspot.com/learnhubspot/how-to-create-a-course#how-to-add-a-scorm-package) (aka an e-learning file).
- **Resources** tend to be passive and more useful for summarizing and distributing information - an example of a resource is a [Label](https://learninganddevelopment.hubspot.com/learnhubspot/how-to-create-a-course#add-a-course-description).
Check out the different types of activities [here](https://help.totaralearning.com/display/TL12/Activities) and the different types of resources [here.](https://help.totaralearning.com/display/TL12/Course+Resources)
**Please note: **the HubSpot Foundations Flex agenda page consists of mainly **Labels **which contain links to other courses.
---
### How to Add a SCORM Package (aka a RISE E-learning)
**Tip: **Before adding a SCORM package to your course, [c](https://learninganddevelopment.hubspot.com/learnhubspot/how-to-create-a-course)[heck out this slide deck](https://docs.google.com/presentation/d/1173zIcXVeTKlvZKhnd0zBdXyDpA93F_R28XzDmq4JAU/edit) for information on how to export content from Articulate Rise and Articulate Storyline to make sure you're capturing the completion information correctly.
1. On the course page, click the** Turn editing on** button in the top right corner.
2. Click the **Add an activity or resource **link under the appropriate section (this should usually be *Training*).
3. Select **SCORM package** under *ACTIVITIES.*
4. Click **Add **and you will see *Adding a new SCORM package to Introduction***.**
5. Under **General**,
- Under *Name, *enter the text “**Click here to access - Name of Course**”.
- Leave the portion under *Description* blank. If you want to add a description for learners, make sure to select the checkbox for *Display description on course page. *
6. Under **Package,** upload the SCORM package (this should be the .ZIP file or you'll get an error message).
**7. Skip the following settings: ***Appearance*, *Availability*, Grade, *Attempts management*, *Compatibility settings*, *Common module settings*, and *Restrict access* .
**Please note:** you can find more details on these settings [here](https://help.totaralearning.com/display/TL12/SCORM).
8. Under **Activity Completion, **
- Select **Show activity as complete when conditions are met **(otherwise a learner could check a box and claim they “completed” the course) for *Completion tracking*.
- Clear the checkbox for *Require view*.
- Clear the checkbox for *Require grade*.
- Make sure that *Require minimum score* is disabled.
- For *Require status, *select the checkboxes **Passed **and** Completed.**
- Clear the checkbox for *Require all scos to return "completed" status*.
- Make sure that *Expect completed on* is disabled.
9. Click **Save and return to course.**
---
### How to Add a Google Slide Deck
1. On the course page, click the** Turn editing on** button in the top right corner.
2. Click the **Add an activity or resource **link under the appropriate section (this should usually be *Training*).
3. Select **Label** under *RESOURCES.*
4. Click **Add **and you will see *Adding a new Label to Introduction*.
5. Under ****General, ****follow the directions below to **add the HTML code for your Google Slides**:
- Under *Content*, click the** rightwards arrow with corner downwards** **button ** to expand the toolbar.
- Click the **code** **button ** to open the HTML editor.
- Paste the following text in the HTML editor:
**Title of Deck**
6. **Skip** the following settings: *Common module settings* and *Restrict Access*.
7. Under **Activity Completion, **select **Do not indicate activity completion for ***Completion tracking***.**
8. Click** Save and return to course.**
**Please note: **to collect completion information for this Google slide deck, you will need to add another **Label**.
9. Within the same section block, click the **Add an activity or resource **link.
10. Select **Label** under *RESOURCES *and click **Add**.
11. Under **General, **
- Click the ** **button and select **Heading (medium).**
- In the rich text box, enter the text: “Click the checkbox to the right once you've reviewed the slides/resources.”
12. Click **Save and Return to Course. **
---
### How to Add a Loom Video
1. Navigate to your Loom video and click "share" on the top right hand corner.
- Select the "Embed" tab
- Click "copy embed code"
2. On the course page, click the** Turn editing on** button in the top right corner.
2. Click the **Add an activity or resource **link under the appropriate section (this should usually be *Training*).
3. Select **Label** under *RESOURCES.*
4. Click **Add **and you will see *Adding a new Label to Introduction*.
5. Under **General, **follow the directions below to **add the HTML code for your Loom Video:**
- Under *Content*, click the** rightwards arrow with corner downwards** **button  ** to expand the toolbar.
- Click the **code** **button ** to open the HTML editor.
- Paste the embed code from Loom
6. **Skip** the following settings: *Common module settings* and *Restrict Access*.
7. Under **Activity Completion, **select **Do not indicate activity completion for ***Completion tracking***.**
8. Click** Save and return to course.**
**Please note: **to collect completion information for this Google slide deck, you will need to add another **Label**.
9. Within the same section block, click the **Add an activity or resource **link.
10. Select **Label** under *RESOURCES *and click **Add**.
11. Under **General, **
- Click the**  **button and select **Heading (medium).**
- In the rich text box, enter the text: “To receive credit for this video, make sure you view the complete video and then check off the box to the right.”
12. Click **Save and Return to Course. **
---
Set Course Completion
**THIS IS REQUIRED FOR DATA PURPOSES. WITHOUT COURSE COMPLETION, WE CAN'T SEE ACCURATE COMPLETION STATS.**
**Please note**: there are two levels of completion settings:
- within an individual activity or resource. (you might have already set this up in the sections above)
- within the course settings.
#### Part 1: Within an individual activity or resource
1. Click the **Edit **button next to the activity or resource that you have added.
2. Scroll down and click the **Activity completion **dropdown menu.
3. Next to *Completion tracking*, select the appropriate option in the dropdown menu:
- **Do not indicate activity completion **(when it's not mandatory to complete the activity, usually when it's a label or a URL).
- **Learners can manually mark the activity as complete **(a checkbox shows up next to the activity for the learners to select).
- **Show activity as complete when conditions are met **
- Select the checkboxes **Passed **and** Completed **next to *Require status.*
- **Skip **the rest of the settings under **Activity completion**.
4. Click **Save and return to course**.
#### Part 2: Within the course setting
1. On the course page, select **Course Completion **under *Administration* on the left sidebar menu.
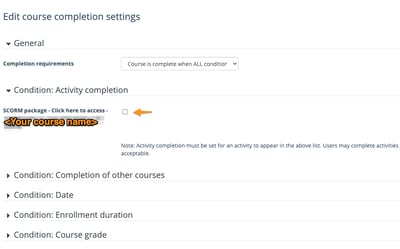
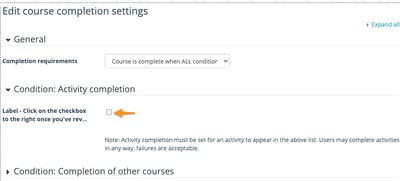
2. Under **Condition: Activity completion, **you should see the activity or resource that you have added (either the SCORM package or deck):
- - If you have added a SCORM package, you should see a checkbox for *SCORM package - Click here... - ***select the checkbox.**
|  |
| --- |
- If you have added a slide deck, you should see a checkbox for *Label - Click on the checkbox (to the right) once you've reviewed the slides / resources **- ***select the checkbox.**
|  |
| --- |
**Please note**: you shouldn’t see options for anything else. If you do, that means you need to edit that activity's or resource’s completion settings again.
3. Under **Condition: Completion of other courses, **select the courses that should be completed in order to mark this course as complete. This setting is usually for courses that have other courses embedded within (e.g. Foundation Flex agenda course page). Skip to step 6 if this setting does not apply to your course.
**Please note**: Currently, it's not possible to expand the *Courses available *box to view the full course names. Please refer to [these steps](https://docs.google.com/document/d/1tmy285Zlnqol4xyUYJ3fLlAQK75kfu5n2XDPyBRz2T4/edit) to view the full course names.
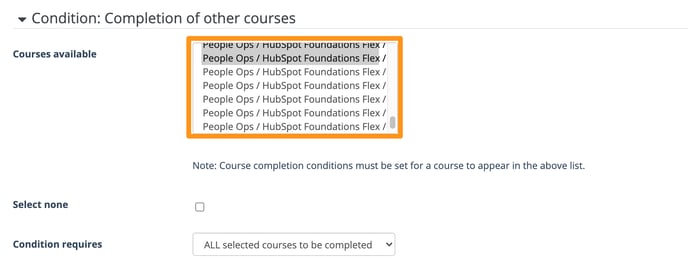
4. Select an option for *Condition requires:*
- - *ALL selected courses to be completed *or
- *ANY selected courses to be completed*
5. Skip all the other settings.
6. Click **Save Changes**.